

© by Christa 10.09.2011
English 
This tutorial was written and designed by me © Christa
The © copyright for this tutorial belongs to me alone
The © for the translation belongs to me and Petra

This tutorial may neither be copied, nor offered for download at any other site
The © copyright for the material belongs to each individual artists.
Each of the tutorial, my tinkering has even pay attention to copyright.
My tutorials are intended as a suggestion.
thank you Paulina for the Tubes
Hintergrundbild © Christa
Autumn Elemente Cajoline Scrap
Maske ©Titine
© All copyrights belongs to the original artists
I'm just the designer
This tutorial was written with PSP 9
Print Icon - Print Page


thank you all my tester from my Tutorials
************************************************************
Mein Material 
Xero Bad Dream XL
L+K Zitah
Nik Color Efex Pro 3.1
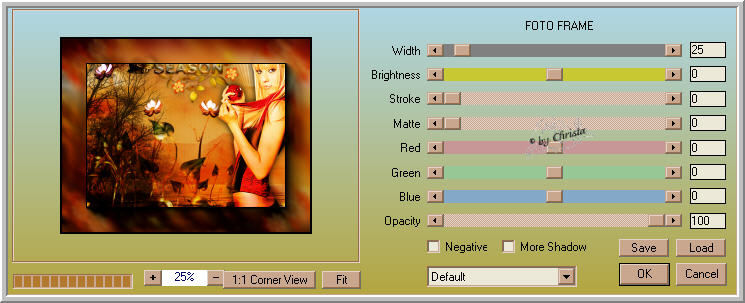
AAA Frames Foto Frame + Transparent Frame
Mask into Mask folder to psp
Separate tubes using
**********************************************************
 |
You may take this little figure
along for your orientation |
|
**********************************************************
**********************************
A word to all of you
All the discription for my Tutorials are "How I create my Image"
For your Tubes and Colors you maybe change the settings -
If you use my Elements - you have to colorize
I do not write this anymore at the Tutorial
Lets start
**********************************
Step:1
Open all my material at PSP - mimimize
Open my Autumimage ©C.G or your own
Select a nice color for your Image
My FG color #f9ac3a
New Layer fill with your Colors
Layer -Load Mask from disk

Merge - Merge Group - Blend Mode - Multiply
Plugin L + K Zitah

**********************************
Step : 2
Copy your Tube - mine is one of Paulina - paste as new Layer
Arrange to the right - Blend Mode - Hard Light
Drop Shadow 0/0/35/35,00 black
copy "AD_Fantasies_November(43).png
paste as new Layer - arrange to the left next the Tube to the bottom till the border
Plugin Nik Color Efex Pro

Blend Mode - Hard Light - Layer - Duplicate
**********************************
Step : 3
Copy the Textfile - paste as new Layer - Arrange
Plugin Xero Bad Dream XL (Default)
Drop Shadow 0/0/35/7,00 Black
Copy "element_ecken.psd - paste as new Layer
Layer - merge visible
**********************************
Step : 4
Layer duplicate - Plugin AAA Frames Transparent Frame

Merged Layer is activ
Plugin AA Frames Foto Frame
Repeat to this Layer L + K Zitah
**********************************
Step:5
Paste your Watermark - the text for the Copyright out of the material
as new Layer - Arrange - Send Layer to the top
Merge all
Maybe you like to resize
Do not forget Sharpen
I ajdust the Nik Filter with this Values


Save as JPG
I hope you enjoyed the tutorial
Sincerely Christa