© by Christa 27.08.2011
English 
This tutorial was written and designed by me © Christa
The © copyright for this tutorial belongs to me alone
The © for the translation belongs to me and Petra

This tutorial may neither be copied, nor offered for download at any other site
The © copyright for the material belongs to each individual artists.
Each of the tutorial, my tinkering has even pay attention to copyright.
My tutorials are intended as a suggestion.
Should I have, unknowingly, violated any copyright, I ask that you notify me via
cg@silvercurlyart.de
My thanks for the lovely material, for without it these pictures would not be possible
thank you Chaosgaby for the Tubes
© All copyrights belongs to the original artists
I'm just the designer
This tutorial was written with PSP 9
Print Icon - Print Page


thank you all my tester from my Tutorials
************************************************************
Mein Material 

Xero Improver
L&K Zitah
Graphics Plus Cross Shadow
**********************************************************
|
You may take this little figure
along for your orientation |
|
**********************************************************

A word to all of you
All the discription for my Tutorials are "How I create my Image"
For your Tubes and Colors you maybe change the settings -
If you use my Elements - you have to colorize
I do not write this anymore at the Tutorial
Lets start
Step: 1
New Canvas 800 x 800 px transparent
light FG Color #a35502
darker BG Color #451e01
fill Canvas with BG Color
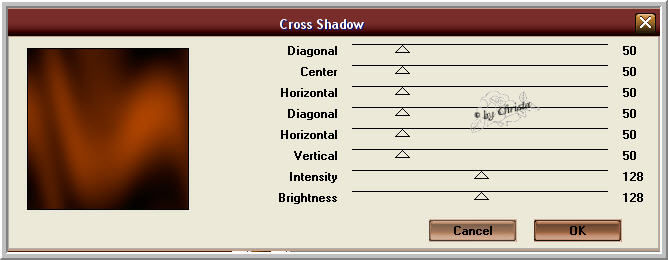
Plugin Graphics Plus Cross Shadow
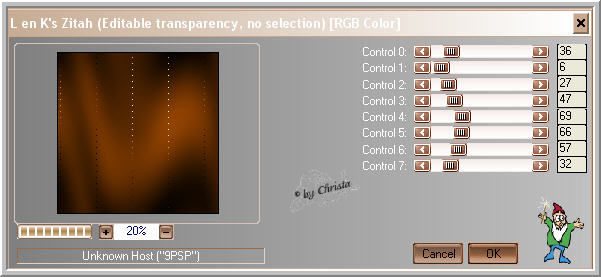
Plugin L+K Zitah
Step: 2
Open "element1_steampunk_cg.psd - Copy
paste as new Layer - Colorize - Blend Mode - Soft Light
You may use your own
Open your Femme Tube - mine chg.14.24082011.psd
Copy - Paste as new Layer - I resize mine to 115 %
Layer duplicate - Blend Mode - Soft Light
Originaltube - Plugin Xero Improver 10/10/10
Step:3
Open the Tube chg.15.23082011.psd
Image - Resize - 50 % all Layers not chequed
copy - paste as new Layer - Arrange - send Layer to the top
Arrange into the left top corner - Blend Mode -Hard Light - Duplicate
Image - Mirror - merge down - duplicate
Image - Flip - merge down
Step: 4
Copy "borte_steampunk_cg.psd
paste as new Layer - Colorize
Duplicate Layer 2 times -
Copie 2 - Blend Mode - Soft Light - invisble
Copie - Blend Mode - hard Light - invisible
Layer borte - Blend Mode - Multiply - visible
Step: 5
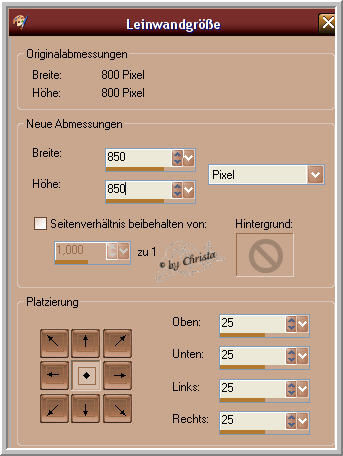
Layer 1 is activ - Selection - All - Image - Crop to Selection
Image - Canvassize
Magic Wand - select the Border - New Raster Layer -
Arrange - Send Layer to the bottom
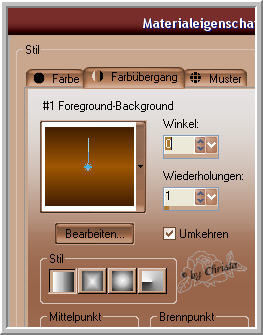
Fill with this Gradient
Effects - 3 D Effects - Inner Bevel

Effets - 3 D Effects - Chisal - BG Color
Effects - Edge Effects - Enhance - Selection - None
Paste your Text and Watermark as new Layer
My Font

Step: 6 Animaton
Copy all Layer - Open the AniShop - paste as new Animation
PSP - Layer borte invisible - Copy is visible
Copy all Layer - AniShop - paste after the selected Frame
PSP - Copie invisible - 2. Copie visible
Copy all Layer - AniShop - paste after the selected Frame
Edit - Select all
Animation - Frameproperties to 25
Save as GIF
I hope you enjoyed the tutorial
Sincerely Christa