© by Christa 22.08.2011
English 
This tutorial was written and designed by me © Christa
The © copyright for this tutorial belongs to me alone
The © for the translation belongs to me and Petra

This tutorial may neither be copied, nor offered for download at any other site
The © copyright for the material belongs to each individual artists.
Each of the tutorial, my tinkering has even pay attention to copyright.
My tutorials are intended as a suggestion.
Should I have, unknowingly, violated any copyright, I ask that you notify me via Mail
cg@silvercurlyart.de
thank you Chaosgaby for the Exclusiv Tube
Tube © Ophelias-Overdose
© All copyrights belongs to the original artists
I'm just the designer
This tutorial was written with PSP 9
Print Icon - Print Page


thank you all my tester from my Tutorials
************************************************************
Material 
Xero Bad Dream XL
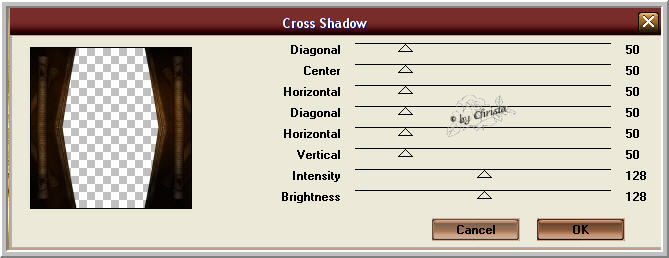
Graphics Plus Cross Shadow
Nik Color Efex Pro 3.1
Mask into Mask Folder to PSP
**********************************************************
|
You may take this little figure
along for your orientation |
|
**********************************************************

A word to all of you
All the discription for my Tutorials are "How I create my Image"
For your Tubes and Colors you maybe change the settings -
If you use my Elements - you have to colorize
I do not write this anymore at the Tutorial
Lets start
Step: 1
Open my material at PSP - duplicate Template_Steam_CG.psd
with Shift + D close the Original
You may change my Elements if you like it
Activate Layer paper2
Magic Wand - click next to the paper - Selection - Invert
New Raster Layer
Copy your Image or Tube or the Selection
for me attack copy.jpg
paste into a Selection
Layer - Load Mask from disk - Merge group

Filter Nik Color Efex Pro 3.1 - Bi Color User Defined
For me Colorset Brown 1

Step: 2
Selection - None - Opycity - 60 %
I adjust the Nik Filter to the Layer Paper_CG
Copy your Tube - mine chg.9.15062011.psd
paste as new Layer
Arrange the Tube to the bottom till the border - Arrange - Send Layer
ont top of the Layer Frame
I adjust the Filter Xero Bad Dream XL Default
Sharpen to the Tube
Step: 3
Repeat the Nik Filter to the Layer
Koffer, Grammophon, Frame, Randebene, Zahnäder
Paste the Text as new Layer
Arrange to the top - Arrange - send Layer to the top
copy "martavaneck_steampunk_elements99.psd
Paste as new Layer - Arrange the Element below the Text
Repeat the Nik Filter
Arrange the small wheels on top of the Element
Arrange the Layer - Koffer + Gramophon
on top of the Borderlayer - they have to overlay the border a little bit
Step: 4
Paste the Copyright and your Watermark as new Layer
Arrange - Send Layer to the top
Activ the Layer with the sidelement
Tis is our Animationlayer
Step: 5
Copy - All Layer .AniShop
paste as new Animation
PSP - Plugin Graphics Plus Cross Shadow
Copy - All Layer - AniShoop
paste after the selected Frame
PSP - do not Undo anything - repeat Cross Shadow
Copy - All Layer - AniShop
paste after te selected Frame
Edit - Select all
Animation - Frameproperties to 20
Save as GIF
I hope you enjoyed the tutorial
Sincerely Christa