Scrap Sweet

© by Christa 15.08.2011
English 
This tutorial was written and designed by me © Christa
The © copyright for this tutorial belongs to me alone
The © for the translation belongs to me and Petra

This tutorial may neither be copied, nor offered for download at any other site
The © copyright for the material belongs to each individual designer
Should I have, unknowingly, violated any copyright, I ask that you notify me via
cg@silvercurlyart.de
My thanks for the lovely material, for without it these pictures would not be possible
thank you Chaosgaby for the Tubes
Tag Template by Daira
© All copyrights belongs to the original artists
I'm just the designer
This tutorial was written with PSP 9
Print Icon - Print Page


thank you all my tester from my Tutorials
************************************************************
Mein Material 

Xero Improver
Xero –Fritillary
Xero Bad Dream XL
Alien Skin_Eye Candy 5 Impact_Glass
Copy Preset chg_2011_2.f1s- into Plugins AlienSkin_ Eye Candy5_Settings_Glas
**********************************************************
|
You may take this little figure
along for your orientation |
|
**********************************************************
A word to all of you
All the discription for my Tutorials are "How I create my Image"
For your Tubes and Colors you maybe change the settings -
If you use my Elements - you have to colorize
I do not write this anymore at the Tutorial
Lets start
Step : 1
Opan all your Material at PSP - Minimieze - select a nice Tube
Sarch 2 Colors out of your Tube
My FG Color #90081c
BG Color #f29495
New Canvas 760 x 700 px transparent
Open glasmosaic_cg.psd - Copy - paste as new Layer
Open the Template LMC_Tag Template - By Daira
Step : 2
Copy the Layer Ellipse - paste as new Layer
Copy the Layer Square - paste as new Layer
Copy the Layer Left Black Flower - paste as new Layer
Arrange to the left and to the bottom
Copy the Layer - Left Circle - paste as new Layer
Arrange on top of Black Flower
Rename this Layer into the Originalname as the Template
For a better Orientation
Your Image has to look like this

Step : 3
We work now to the each Layer
Layer square - Magic Wand - Tolerance + Feather 0
Select - Selection - Modify - expaned to 5 px
Fill Layer with FG Color
New Raster Layer - Open your Tube - I mirrored mine
copy - paste into a selection -
Plugin Xero Improver 10/10/10
Layer - merge down - Selection - None
Layer duplicate - Originallayer square
Image - Roation - Free Rotation

Adjust to both Layer this Drop Shadow
0/0/65/8,00 Black
Step : 4
Layer ellipse is activ - Magic Wand - select
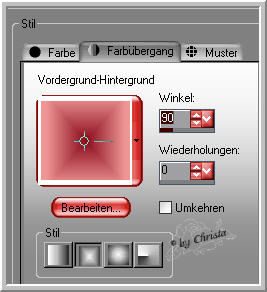
Fill Layer with this Gradient - BG Color to Black

Selection - Modify - Select a Selectionborder

New Raster Layer - BG Color change to your light color äf29495
Gardint - invert not chequed
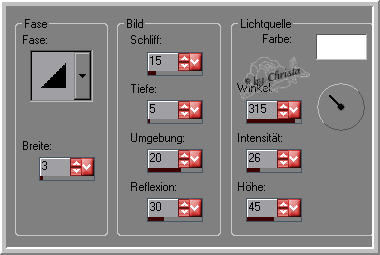
Fill the Selection - Effects - 3 D Effects - Inner Bevel
Plugin Xero Bad Dream XL

Selection - None - Repeat the Drop Shadow
Rename into "border_ellipse.
Step: 5
Layer left black flower is activ - Magic Wand click next to the Element
Selection - Invert - Fill with FG color
Click at the Layerange to the Belt -

Effects - 3 D Effects - Cutout

Layer - click to the Belt again - close
Adjust - Noise

Selection - None - Layer duplicate - Image - resize to 90 %
all Layers not chequed - Image - Rotation - Free rotation -
to the left to 5,00
Arrange like this - See Image

Step: 6
Layer left circle is activ -
Magic Wand - select next to the Element
Selection - Invert - fill with the second Gradient -
Invert is chequed
Open your Tube - undo mirror - Copy
No new Layer - paste into a Selection -
Layer - click to the Blet - repeat the Cutout
Close the Belt
New Raster Layer - load Plugin Eye Candy 5 Impact Glass
Preset chg_2011_2

Selection - None - Adjust to both 2 Layer of left black flower
the Drop Shadow
Step: 7
Open the Tube "lisaminor_wa_2sweet.psd - copy
paste as new Layer inf irst place - Arrange tot he right
Sharpen
Layer - Duplicate - Oeriginallayer is activ
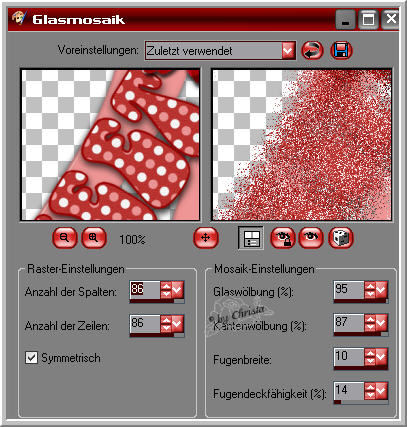
Effects - Textureeffekts - Mosaic Glass
Suplicated Layer is activ - repeat the Drop Shadow
Open and copy - "eleent1_cg.psd - paste as new Layer
Arrange to the left and to the top - Duplicate - Image - Mirror - Image - Flip
Merge - merge down - Adjust the Drop Shadow
Open "element_hg_cg.psd - Copy - paste as new Layer
Arrange - send Layer to the bottom
Arrange Layer 1 to the top
paste your Watermark
Layer ellipse is activ
Plugin Xero Fritiallary

Range

Layer - Merge visible - save as PNG File
I hope you enjoyed the tutorial
Sincerely Christa