

© by Christa 12.07.2011
English 
This tutorial was written and designed by me © Christa
The © copyright for this tutorial belongs to me alone
The © for the translation belongs to me and Petra

This tutorial may neither be copied, nor offered for download at any other site
The material offered comes from tube exchange groups, or tube sites from the web
The © copyright for the material belongs to each individual designer
Should I have, unknowingly, violated any copyright, I ask that you notify me via Email
My thanks for the lovely material, for without it these pictures would not be possible
thank you Chaosgaby for the Exclusiv Tubes
and Tube PaulinaDesign , COLACAO Tubes
Paulinas Tube Link Orginal Image
©Ophelias Overdose
© All copyrights belongs to the original artists
I'm just the designer
This tutorial was written with Corel Paint Shop Pro X3
Print Icon - Print Page


thank you all my tester from my Tutorials
************************************************************
My Material 
Diese Filter werden benötigt...
Xero Bad Dream XL
Graphics Plus Cross Shadow
AAA Frames - Foto Frame
FM Tile Tools Blend Emboss
Mehdi Kaleidoscope 2.1
Optik Verve Labs- Virtual Photographer : HIER
**********************************************************
 |
You may take this little figure
along for your orientation
|
|
**********************************************************

Step :1
Open all Material at Paint Shop Pro - Minimize
Select two Colors out of your Tubes
Mine FG Color #a56208
BG Color #5d2603
Open "image_cg.psd - with this you got my Selection - Duplicate
with Shift + D close the Original
Fill with BG Color
Plugin Graphics Plus - Cross Shadow


Step:2
Open "paper1.psd - Copy - paste as new Layer
Blend Mode - Soft Light
Layer - Merge - Merge down
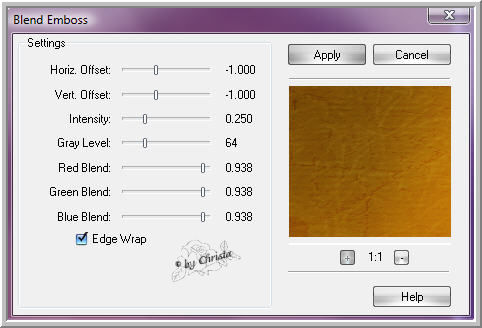
Plugin FM Tile Tools Blend Emboss
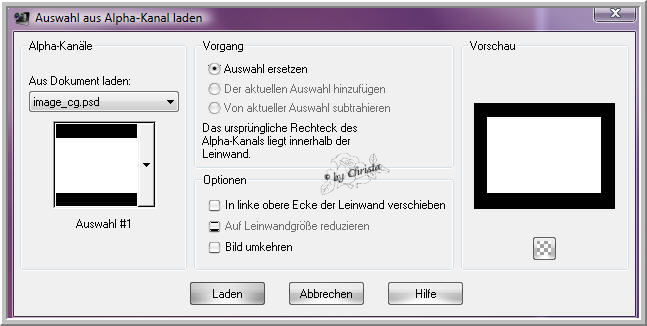
Selection - Selection - Load/Save - Selection from Alpha
New Raster Layer fill with FG Color
Drop Shadow 0/0/85/18,00 Black
New Raster Layer - your paper is still at the Cache
Edit - paste into a Selection -
Blend Mode - Soft Light
Repeat Blend Emboss - Merge - Merge down
Selection - None - Repeat the Drop Shadow

Step :3
Open the Violine - Copy - paste as new Layer
Image - Resize to 70 % - all Layers not chequed
Arrange to the left - Drop Shadow 0/0/85/10,00 Black
Adjust Plugin Xero Bad Dream XL - Default
Open your Facetube - mine CH.10.04052011.psd
I resize mine to 65 % - Copy - Paste as new Layer
Arrange to the right - Arrange - Send Layer down
Load once again the Selection #1 - Selection - Invert
Delete - Selection - None
Repeat the last Drop Shadow to the Tube
Open the Text - copy - paste as new Layer
Arrange on top of the Violine - Arrange - send Layer to the top
Drop Shadow 0/0/55/10,00 Black
Layer 1 became invisible - Layer - merge visible
Rename into "Image"....
Layer 1 became visible again

Step :4
Layer - Image - Duplicate - Originallayer Image - Image - Rotation Free Rotation
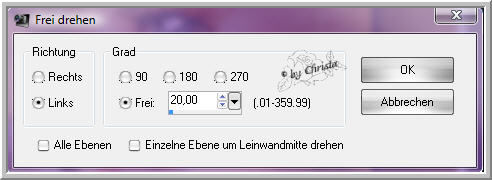
Activ the Layer Copy of Image
New Raster Layer - Selection - Load Selection from Alpha
Selection #2
Fill the Selection with FG Color - repeat Cross Shadow
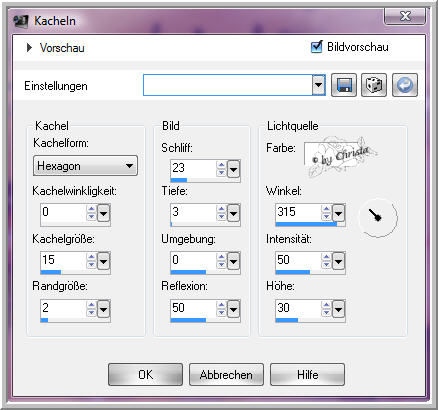
Effects - Textureeffects - Tiles
Effects - 3 D Effects - Inner Bevel
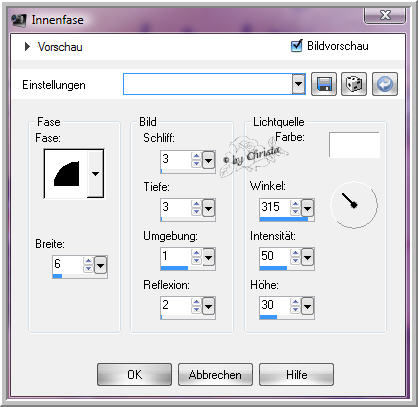
Selection - None - Drop Shadow 0/0/85/10,00 Black
Plugin Xero Bad Dream XL

Step :5
Open "element1_cg.psd - Copy - paste as new Lyer
For you Colorize - Blend Mode - Soft Light
Layer - Arrange - send Layer down - Plugin Mehdi Kaleidoscope 2.1
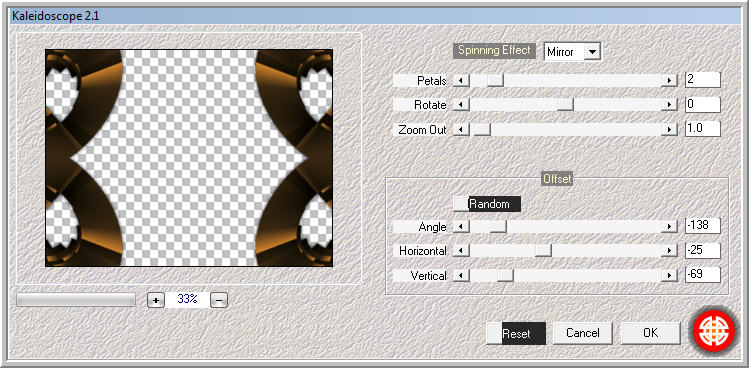
Layer 1 is activ - Edit - Copy
Selection - Selection - All - Image - Crop to Selection
Image - Canvassize
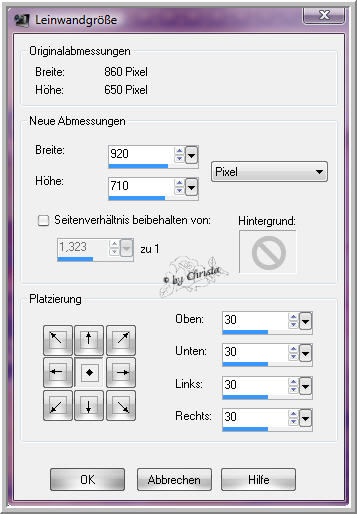
New Raster Layer - Arrange send Layer down - fill with FG Color
Repeat Cross Shadow
new Raster Layer - Arrange - Send Layer to the top - Selection - All
Edit - paste into a Selection
Selection - Modfiy - Contract to 40 px - Delte
Selection - Invert - Repeat the Inner Bevel -
Plugin AAA Frames - Foto Frame
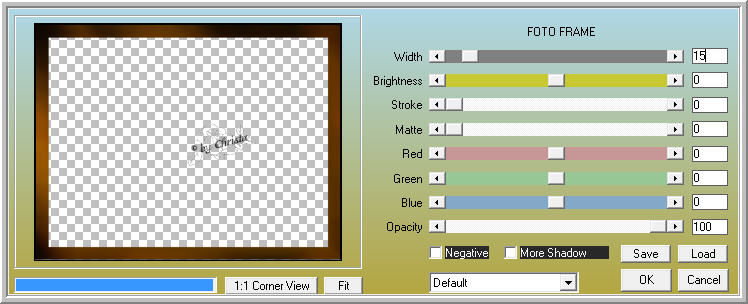
Selection - None

Step :6
Open your 2. Tube - mine PaulinaDesignWomanGold44.psd
Image - Resize to 75 % - Copy - close
Paste as new Layer - arrange to the left
Drop Shadow 0/0/85/10,00 Black
Open deco.psd - Copy - paste as new Layer
Arrange to the right - for you colorize - paste your Watermark as new Layer
Merge all
Maybe you like to resize as you like it
Adjust Plugin OptikVerve Labs - VirtualPhotographer
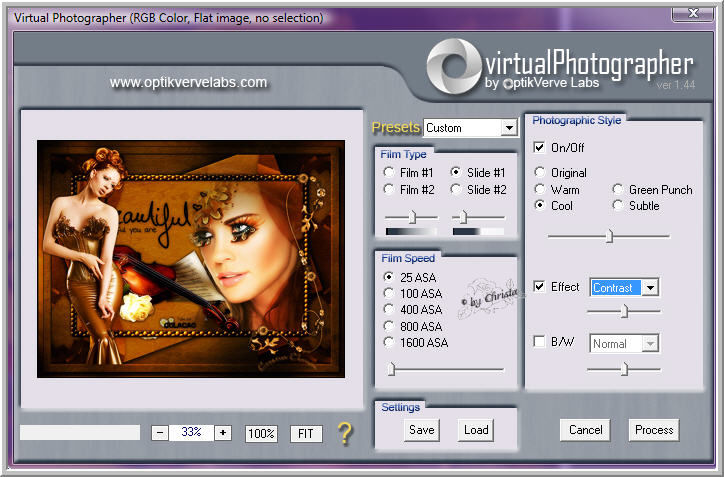
Save your Image as a JPG
I hope you enjoyed the tutorial
Sincerely Christa
