© by Christa 01.11.2010
English 
This tutorial was written and designed by me
The © copyright for this tutorial belongs to me alone
The © for the translation belongs to me and Petra

This tutorial may neither be copied, nor offered for download at any other site
The material offered comes from tube exchange groups, or tube sites from the web
The © copyright for the material belongs to each individual designer
Should I have, unknowingly, violated any copyright, I ask that you notify me via
cg@silvercurlyart.de
thank you Chaosgaby for the Exclusiv Tubes
Mask © Adita
© All copyrights belongs to the original artists
This tutorial was written with PSP 9

thank you all my tester from my Tutorials
Image from my Tester
************************************************************
Material 
Graphics Plus - CrossShadow
Pixelate - Sector Mosaik Hier
Xero Improver
AAA Frames Foto Frame
Nik Color Efex Pro 3.1 : HERE
Mask into Mask Folder to PSP
**********************************************************
|
You may take this little figure
along for your orientation |
|
**********************************************************

Step : 1
New Canvas 860 x 645 px transparent
light FG Color #637aef
dark BG color #00169f
Fill Layer with BG Color
Plugin Graphics Plus - Cross Shadow ( Default 128/128)
Plugin Pixelate - Sector Mosaic

Effekts - Edge Effects - Enhance
Step : 2
New Layer fill with FG Color
Layer - Load Mask from Disk

Drop Shadow 0/0/65/15,00 Black
Copy your tube for the Background
mine chg.7.24102010.pspimage
paste as new Layer
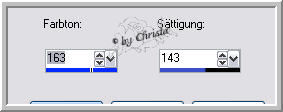
Colorize to your Colors - H + S of FG Color - take
a little less at S
My Values
Layer - Blend Mode - Luminace L
Step : 3
Copy from the material - element_cg.pspimage
paste as new Layer - arrange to the bottom - colorize
Blend Mode - Hard Light
copy "chg.1.24102010.pspimage - paste as new Layer
Arrange to the right - I used the Nik Filter to colorize
my Tube
Upper color - Select this color # 8f85f1
Lover Color #3a56e4

Its up to your Tubes
Drop Shadow 0/=/65/15,00 Black
Plugin Cero Improver 10/10/10
Step : 4
copy "chg.6.031102010.pspiamge - paste as new layer
Image - Resize to 75 % all Layer not chequed
Arrange to the left - Blend Mode - Overlay
Repeat Drop Shadow + Xero Improver
Layer 1 is activ - Selection - All - Image - Crop to Selection
Image - Canvassize

New Raster Layer - send to the bottom - fill with Gradient

Step : 5
copy " element1_cg.pspimage - paste as new Layer
(Blend Mode - Hard Light ) maybe you have to colorize
Effects -Edge Effects - Enhance more
Copy " element_rand_cg.pspimage - paste as new Layer
Send to the Top - (Blend Mode - Hard Light )
Effects - Edge Effects - Enhance more
Plugin AAA Frames Foto Frame

Step : 6
Paste now your Deomaterial or use mine from the material
For your own material - use the last Drop Shadow
Paste your Test as new Layer
Watermark as new Layer

Merge all
Image - Resize to

Save as JPG
I hope you enjoyed the tutorial
Sincerely Christa